John Bleasby
A super-insulated Toronto semi demonstrates a leading edge approach to energy performance
Canadian ContractorA homeowner puts his building science profession into personal practice
Given the talk these days concerning ever-tighter envelopes for residential construction, some argue (with merit) that new regulations and energy-efficiency objectives are being considered insufficient input from those at ground level — home builders and contractors. It is therefore welcome when an individual well- versed in building science puts rubber to the road and takes the building theory to a practical level.
That’s exactly what Grant Walkin did. A Building Envelope Specialist with the international engineering consultancy Entuitive Corporation, Walkin put his professional expertise into action by using high performance envelope and insulation techniques on his own home.
A typical Toronto semi-detached needing comfort and energy upgrades
Walkin’s 115-year old semi-detached home is near the lakefront in Toronto’s Beaches district. “The Beaches was originally summer homes, so they were not all that well-built,” he told Canadian Contractor. His 1904 home had never undergone a major renovation, and like many in the neighborhood, was not only due for an upgrade in living space comforts but also in energy efficiency.
From a living space standpoint, the objective was to have four full bedrooms, including a master with bathroom on the third floor, a level suffering usability from a low, A-frame pitched roof. Renovations also included upgrades to the three bedrooms on the second floor, and opening up the main floor space almost completely.
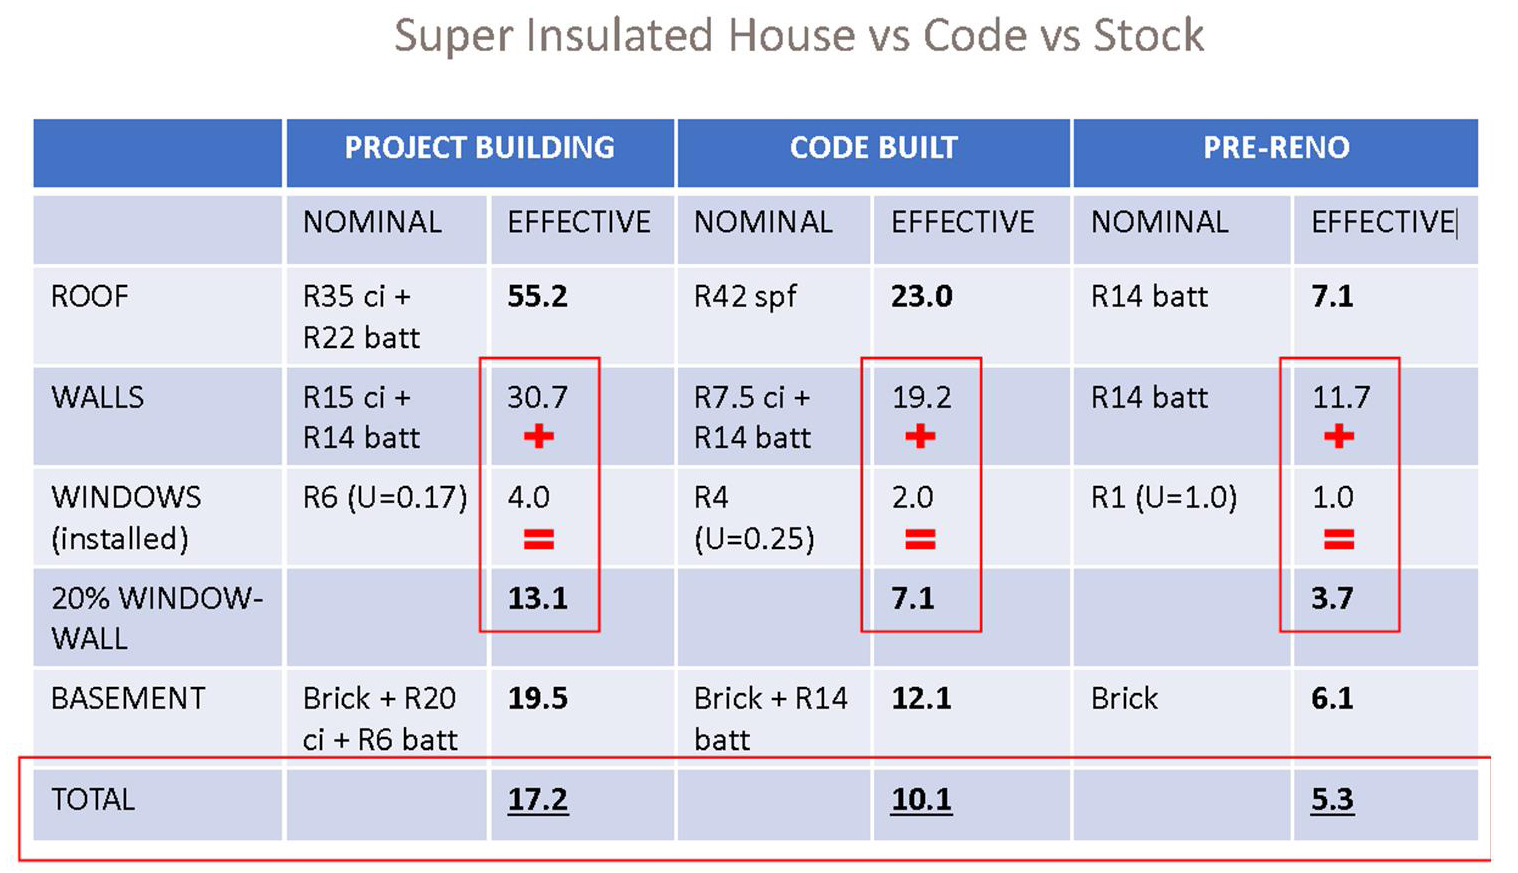
Taking the whole-house approach, Grant Walkin calculated his home’s pre-reno, code-compliant and actual super-insulated R-Value (table: Grant Walkin)
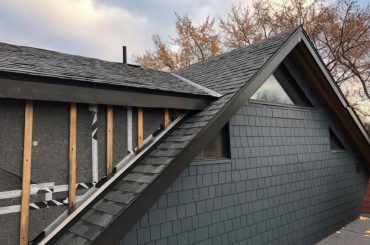
Cement shingles were used to clad the upper sections of the home’s wall. Underneath, the taped exterior insulation and strapping is revealed
(photo: Grant Walkin)
Whole-house, continuous insulation
However, Walkin put really his energies into researching how to super-insulate his side of the semi. And while a major renovation isn’t so unusual in mature areas of Toronto, what set Walkin’s project apart was his fastidious approach to high levels of continuous insulation, based on the principle of using exterior insulation for both walls and roof structures.
That’s an approach not often seen in a renovation project — there are other ways to achieve high insulation values without resorting to a mostly all-exterior approach. Asked why, Walkin explained, “When I was researching, I learned that one of the problems when insulating a house are the air and vapor control layers. They become more critical as the house gets more insulated,” he said. “If you just pack insulation into wall cavities, you have to deal with condensation occurring within those walls, often without even knowing that the wood framing and sheathing are deteriorating. The exterior insulation approach increases the building’s durability by reducing the condensation risk within the walls and within the organics of the wood frame and sheathing by keeping the house’s frame structure on the warm side. For example, in the event that there is any air leakage from the interior space in the winter time getting into the walls, there is a much lower risk of interstitial condensation occurring within the walls and any resultant deterioration.”
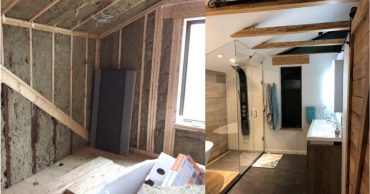
Before and after’s of the 3rd floor master bathroom. Note the use of mineral wool in the stud cavities. In addition, there was significant exterior insulation as well before cement shingle and sheeting combinations were installed as the final exterior cladding (photo: Grant Walkin)
A different approach to air and vapour barriers
Punctures in the poly sheet typically installed under the drywall can easily occur, a result of either a homeowner’s or installer’s lack of building science knowledge, Walkin said. Even a simple hole for electrical receptacles or light fixtures can initiate serious moisture issues. “The concern is that moisture will attack that one spot. That can really damage the area. You can’t really see it, so it can go undetected for quite a long time.”
Walkin’s approach to the issue of air and vapour layers was two-fold. First, the air barrier was incorporated into the exterior wall and roof insulation process. “The air barrier for the walls of the house was the first layer of exterior insulation,” he explained. “I kept the original wood clapboard siding on the house and added foil-faced EPS insulation as my first layer — all those seams were taped. Then a second layer of insulation was added overtop with seams offset. The 2 x 6 wall structures added to increase the third floor living space were sheathed with OSB, and all those seams were also taped and treated as the air control layer before two layers ofexterior insulation was added.
The interior drywall became Walkin’s vapour barrier. “I relied on the principals of the airtight drywall approach for my vapour retarder. However, my air barrier was not my drywall — that can be quite tricky, especially where interior walls abut exterior walls. The air barrier needs to be 100% continuous throughout the whole house. However, that’s not necessary for the vapor retarder. You can have some interruptions.” He painted the exterior sides of the drywall with a primer and two coats of latex paint, a Class 3 vapour retarder. With that, combined with air sealed receptacle boxes and wires sealed at the boxes, Walkin achieved his satisfactory vapour barrier. At windows and door openings, the drywall was taped into the window jamb extensions that were required to accommodate the deeper walls.
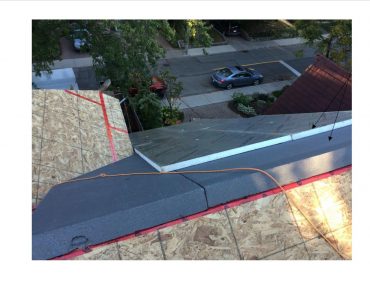
Walkin’s new exterior roof insulation, showing new, taped OSB sheathing, 5-inch GPS, and 2-inch EPS. Strapping and new plywood was added on top of all this before the final shingles. (photo: Grant Walkin)
An unusual approach to roof insulation
Most upgrades to roof or attic insulation will usually see either large amounts of batts or foam sprayed to the underside of the existing roof deck, or a combination of both. Walkin went above and beyond, literally. In addition to mineral wool batts inside the joist cavities, he added significant exterior insulation to the roof “I wanted to wrap the house continuously, completely encapsulating it by going with the same exterior insulation technique as used on the walls.”
After the original roof overhangs were cut off, new ½-inch OSB was installed over the existing roof boards and taped at the seams to provide an air barrier and clean flat surface. Next came a layer of 5-inch GPS (Neopor Graphite impregnated EPS), a Type 1 regular density foam. Then he added a layer of foil-faced, 2-inch high density EPS foam board, laid offset to the GPS and with the seams taped. Strapping was secured back to the structure with 10” long screws, topped with a layer of plywood that acted as the new surface for the roof shingles. Interestingly, this resulted in a significant roof height differential with his neighbor which was contained by a curb running between their respective roofs from front to rear.
Paybacks over the very long term?
What about the energy savings? Walkin’s chart (see above) clearly shows the energy performance gain of his finished project compared to a code-compliant home and his original home. Correctly, he used a whole-house approach to the final R-values, including calculations for the areas of windows, both original and new, and studs in the pre-reno envelope guilty of thermal bridging. The result is that the interior environment of his 1800 square foot home can now be controlled with only a small Minotair HRV/heat pump plus a high efficiency gas fireplace that requires no power to function. Strategically placed electric radiant in-floor heating was also incorporated for comfort.
Energy savings payback? Well, that’s another story. Walkin estimates he spent $84,000 in added costs beyond code-compliance on the energy-performance aspect of his project. This includes significant upgrades to windows and doors. His calculations suggest that the estimated $1650 annual energy savings results in a payback period of 49 years! However, if one adds the interest cost of a 20-year amortized mortgage at current rates, or the lost investment opportunity cost if cash was used, the payback explodes to nearly 75 years. If governments ever re-address grants for significant energy-efficiency upgrades in Canada’s existing home inventory, the payback period would be a different story, of course. Walkin emphasized, however, that the energy savings should rarely be the driver for a high performance home. Rather the building’s health, comfort, and durability are the primary benefits —reduced energy bills are just an extra.
Walkin further admits an older semi-detached home renovation is not the ideal project to demonstrate the full benefits of super-insulation due to several challenges such as a shared wall. However, the lessons learned will be applied to any new residential project he might professionally undertake in the future. His example can also be appreciated by any builder or renovator exploring new ways to meet high levels of comfort and energy performance.
Got feedback? Make your opinion count by using the comment section below,
or by sending an email to:
JBleasby@canadiancontractor.ca
Follow John on Instagram and on Twitter for notifications about his latest posts

![]()
Advertisement
Print this page
Who was contractor who did the build?
Actually, the homeowner (building scientist) did most of the work himself with a friend!