John Bleasby
The Road to NZE (Part Two): Defeating thermal bridging
Canadian ContractorHigh R-value gains in walls are wasted when thermal bridges are overlooked
When it comes to insulation minimums, our current national building code is based on a series of individual component R-values. However times are changing, and as described in Part One of this series, Canada is moving towards a Net Zero Energy future via ratings like EnerGuide and ENERGY STAR systems, and the CHBA’s NZE new labeling program.
Part Two of this series examines thermal bridges and thermal breaks, and explains why understanding them is key to improved whole house energy efficiency.
Unlike code requirements covering structural assemblies like roofs and foundation walls, code-minimum insulation values overlook whole house energy performance values. As a result, bragging to customers about higher-than-code insulation installed in the walls of a new or renovated home is pointless when thermal bridges allow heat to escape the building envelope during the cold Canadian winter. Yet it is relatively straight-forward to eliminate thermal bridges by using simple technology to create thermal breaks.
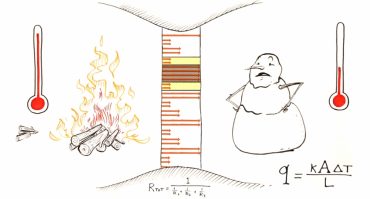
Warmth will migrate to cold quite easily if a parallel flow is permitted, like through studs and framing
(illustration: Autodesk Sustainability Workshop)
Thermal bridges properly defined
A thermal bridge is any element in the construction system installed in a parallel manner, i.e. layers that run parallel to the inside and outside of a home. For example, steel or wooden wall studs that span from the exterior cladding to the interior drywall without interruption are running in parallel. Steel in particular is a notoriously poor insulation material, and wood isn’t that much better.
Thermal bridges are bad. When the cold temperatures outside find those studs, they migrate through the material towards the warmer inside due to conduction. It works in reverse too, with the warmth seeping out towards the cold. The result? A chill is brought into the home, thus lower the overall R-value and the home’s energy efficiency. Insulation between the studs themselves obviously prevents that temperature migration, but only where it is installed. Since close to 25 per cent of a home’s exterior walls and roof structure are made up of studding and framing of some sort, that high R-value insulation is only doing part of the overall job.
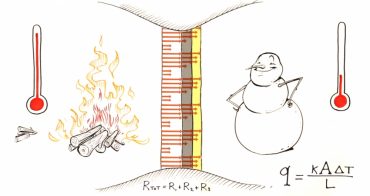
To be effective, thermal breaks must be in series, that is perpendicular to the direction of temperature flow
(illustration: Autodesk Sustainability Workshop)
Thermal breaks can be almost anything, but only if….
A thermal break is anything that interrupts the parallel temperature flow. However, those thermal breaks must be laid in series, that is to say perpendicular to the temperature flow. Studies show that even thin layers of air itself, separated by layers of plastic or other membranes, have measurable and useful thermal break qualities. The air or gas-filled gaps in double and triple-pane windows are a great example. (Note: windows will be discussed in more detail in Part Three of this series.)
A layer of thermally useful air space can be created in series between almost any two building components, like between the brick exterior cladding and the OSB panels that sheath the wall studs, or between the drywall and the insulation itself. Multiple thin layers are better one thick layer, so breaking them up, even with plastic film, has potential benefits. These air spaces in multiple layers reduce heat transference, heat radiation, and heat convection which occurs when the air gap is too large. While plastic films is commonly used for such dividing purposes, aluminum foil can be more effective because of the material’s ability to block thermal radiation. However, remember that installing these thermal breaks in series, not parallel is the key to success.
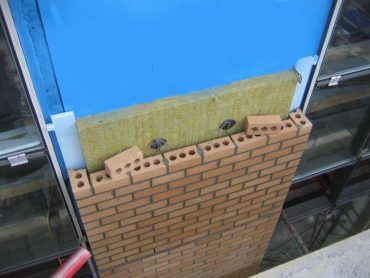
Insulation placed between the exterior cladding and wall sheathing, including a small air gap, provides an important thermal break, and much better whole house energy performance.
(photo: RDH Building Engineering)
The simplest solution is often the best
Of course, the most effective thermal break easily usable in everyday stick-frame home construction is actual insulation added to the exterior side of the OSB or plywood sheathing, and under the final exterior cladding. The resultant walls may be thicker than standard however, so window frames and bucks may need to be adjusted to accommodate. In roofs, a thin layer of foam sprayed on the frame structure of trusses and beams immediately under the roof deck can ‘break’ that thermal bridge.
The significant improvement to the whole-house energy efficiency by incorporating thermal breaks elevates the R-value of the building envelope to levels that help pave the road to NZE, our industry’s future destination.
Read Part One: How whole-house energy ratings are shaping the homes of the future
Next in this series; Windows shake off their reputation as heat-loss culprits
Follow John on Instagram and on Twitter for notifications about our newest posts

![]()
Subscribe to our weekly on-line Newsletter for FREE!!!!

Leave a Reply